


How To Implement Google Consent Mode – The Bits They Didn’t Tell You
Written by Jamie
intro.
Now that Google are forcing advertisers to implement Google Consent Mode (GCM), there is an urgent need for website owners and digital marketers alike to complete the required steps to make sure they are up to date with this latest practice. We don’t believe the official documentation, nor other online articles, explained this process very clearly for our use case, so in this article we are going to cover how we implemented GCM on one of our favourite client websites. We will go into detail on the bits they didn’t tell you in the official documentation.
We have chosen to implement Advanced consent mode, and we are using the latest Google Consent Mode v2. For clarity, Advanced consent mode differs from Basic because it allows loading of the tag manager container itself before consent is provided. (This is necessary if you have things other than tracking tags within tag manager.) And also for clarity, v2 is simply two extra data points which the user can choose to consent to.
There are many plugins, platforms, services, etc., which can do most or some of the Google Consent Mode implementation for you. This article is aimed at the advanced developer, who wants to implement GCM without using any external help. If you’re anything like us, you’ll want to implement any new initiative like this manually the first time, just so you are clear on the ins-and-outs, rather than relying on an external platform or tool which “magically” solves it.
This article assumes you are already using Google Tag Manager (GTM), and you are familiar with how it works. This article also assumes you (or the website you’re working on) is for users in the European Union (for GDPR reasons).
Optional: Google Tag Manager housekeeping
We’re going to start off with some GTM maintenance points. Quite often we find ourselves in a situation where GTM has not been given much love (who’s responsibility is it?), so it’s a very good idea to perform some housekeeping tasks before undertaking a big change in how GTM is setup. Ultimately this will mean it’s easier for other people to understand in future (or yourself in fact!), but also it will be quicker and easier to debug if things aren’t working as they should.
Move any hard coded tags into GTM
Over time, websites usually end up with things scattered around and not centralised where they should be. A popular culprit of this is marketing tags, such as Google Ads, LinkedIn tracking, CRM scripts, etc., which sometimes end up hard coded into the website source code, rather than included via GTM. Do a quick search through your source code to find these (header and footer partials are a good place to start), and move them into GTM, deleting from your code at the same time. This is not only good for general maintenance, but it will be critical if you want to adhere to the users’ Google Consent Mode choices for all of your 3rd party tracking tags (eg. Facebook Pixel, which we’ll discuss later in the article).
If you have a situation where marketing tags are included via plugins or other means, this could mean disabling the plugin rather than simply deleting a code snippet, which may be more problematic, and will likely need some extra thought.
Delete things in GTM which are no longer needed
Quite often GTM ends up with lots of cruft which isn’t needed, isn’t doing anything, or just isn’t working. A common example is Google Analytics 3 (GA3) tags. These can now be safely deleted as they won’t be doing anything anymore. If you can easily identify other tags which you don’t need anymore, double check as best you can, and if you’re sure enough, then a safe way is to pause the tags, leave for a few days, check things again, then delete them.
For Triggers, check the Tags column, and if this is showing 0, they aren’t attached to any Tags. So they aren’t doing anything and can be safely deleted.
Amend your existing GTM tag
You will likely have a GTM snippet in your HEAD already, which will look like this;
<!-- Google Tag Manager -->
 <script>
  (function(w,d,s,l,i){
   w[l]=w[l]||[];w[l].push({'gtm.start': new  Date().getTime(),event:'gtm.js'});
   var f=d.getElementsByTagName(s) [0]j=d.createElement(s),dl=l!='dataLayer'?'&l='+l:'';
   j.async=true;
   j.src='https://www.googletagmanager.com/gtm.js? id='+i+dl;f.parentNode.insertBefore(j,f);
  })
  (window,document,'script','dataLayer','GTM-XXXXXXX');
 </script>
<!-- End Google Tag Manager -->
You will need to add the following code above the existing GTM tag;
<script>
 window.dataLayer = window.dataLayer || [];
 function gtag(){dataLayer.push(arguments);}
 gtag('consent', 'default', {
  'ad_storage': 'denied',
  'ad_user_data': 'denied',
  'ad_personalization': 'denied',
  'analytics_storage': 'denied',
  'functionality_storage': 'denied',
  'personalization_storage': 'denied',
  'security_storage': 'granted'
 });
</script>
This code is defining the default user consent options, and we have made sure to include all necessary options, including the 2 new options as part of Google Consent Mode v2. We have studied other GCM implementations, eg. CookieBot’s implementation, to come up with what we think are sensible defaults (in line with GDPR).
There is also the option of setting your consent defaults within GTM, using the new Consent Initialization – All Pages trigger. We decided to place ours in the source code, purely because the official documentation is very specific about the order this is implemented, and it would be easier for a 3rd party to audit and confirm if it’s in the source code directly, in the correct order.
Create your consent UI
We are going to build our own consent UI as simple as possible for this article.

One key shortcoming of this example, which you may want to address, is that we’re lumping the consent of everything in one choice. There is no granularity of the choices available – all or nothing! Please consider if this is applicable in your situation. (If you do want more granularity, you may want to more carefully consider an external consent platform, as they will often have much more advanced UIs, and save you the effort of creating your own from scratch.)
Above is our simple HTML and CSS code; the absolute basics of a consent UI. Drop this into your website source code. At the same time it’s likely worth disabling or removing any existing consent or cookie UIs you already have in place, as they will be superseded by this. (And will quite likely visually overlap.)
You will notice the consentAll() function call on the button click. This is what will grant the consent which is passed into GTM, which we will cover next.
Implementing the consent logic
Now that you have default consent settings, and a UI to allow the user to choose to consent, we need to write some logic so that clicking the OK button (triggering consentAll()) actually tells GTM that we consent. This is as simple as a single call to gtag() within our consentAll() function;
function consentAll() {
 gtag('consent', 'update', {
  'ad_storage': 'granted',
  'ad_user_data': 'granted',
  'ad_personalization': 'granted',
  'analytics_storage': 'granted',
  'functionality_storage': 'granted',
  'personalization_storage': 'granted',
  'security_storage': 'granted'
 });
}
You should now have a working consent flow. To test this you will be able to run Preview mode in GTM, enter your development environment URL, and use the Debugger to check (more on the GTM debugger later).
Final JavaScript functionality and full code example
At this point you’ve hopefully noticed a few things in our code which need rounding out. One is that the consent UI shows all the time, and the other is that the consent choices do not persist across pages. Neither of these equal a good user experience.
Unfortunately there does not seem to be an official way to determine the user’s prior consent choices. So for this we have to implement our own cookie. We have chosen 30 days as a sensible expiry time for this cookie – after which the user will need to consent again. A full working example is shown below;
The key additions here are that the consent UI is now hidden by default. There is a check on page load to see if a previous consent cookie has been set, and if not, the consent UI is shown. When the OK button is clicked in the consent UI, the consent is granted, a consent cookie is set, and the UI is hidden. (We have also added some utility functions for reading and writing cookies – if you are using any JavaScript libraries already, then you may have this functionality elsewhere.) There is also a check to see if the google-consent cookie has been set previously (eg. the user has made their choice before) and if so the consentAll() function is called to reset the permissions accordingly, and also extend the cookie validity a further 30 days.
The final thing to note is that we’ve added a dataLayer event to indicate to GTM that the user has updated their consent choice. There is no built-in Trigger in GTM for this, so we have to add our own event. More on why we need this later.
Testing in Google Tag Manager
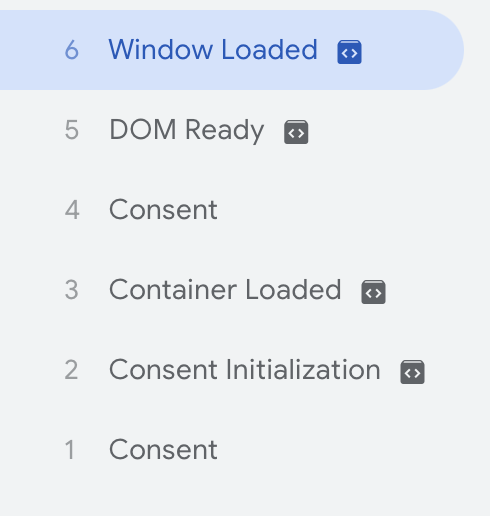
As mentioned earlier, Preview mode is your best friend when testing changes in GTM. If you have a development environment on your local machine, enter that URL when prompted. Hopefully you have some familiarity with the GTM Preview interface, but as a quick illustration, the left panel will detail all events which have occurred on the page.
This is showing our default Consent call is first, following by the Consent Initialization event. This is where the new GTM Trigger (described earlier) comes in. If you’re following our steps, and have your Triggers and Tags set up sensibly, nothing will load in on the Consent Initialization event.
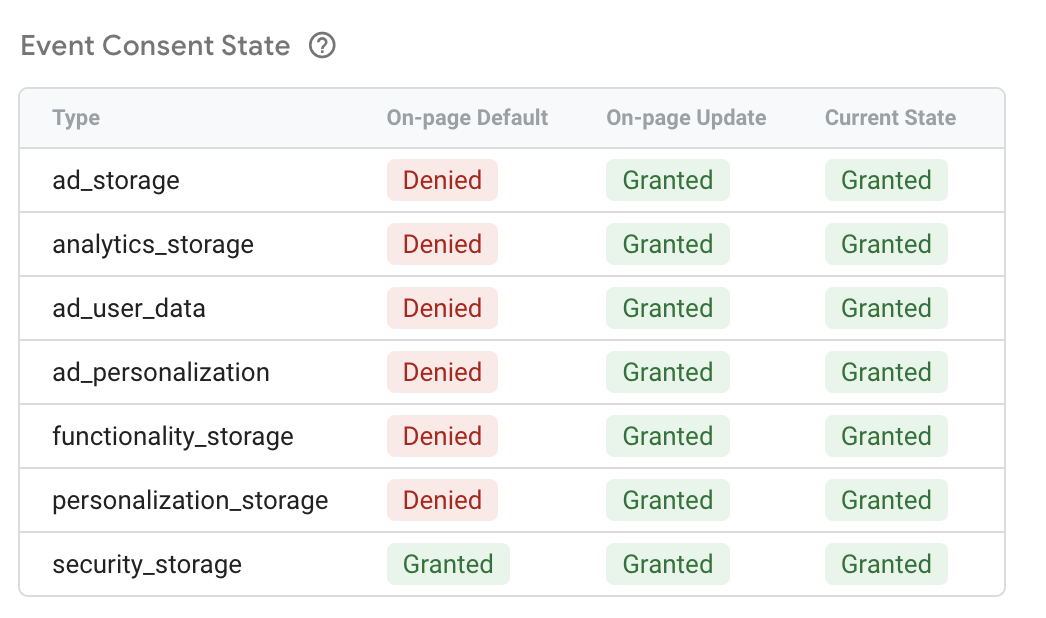
If you now click on any of the events in the panel, and then choose the Consent tab, you should see the states change as the events progress upwards numerically. The lower events (eg. Consent) should be showing Denied, as it’s set as the default, and the higher events (eg. Window Loaded in my case) should look like this, after you’ve clicked the OK button;
Configuring your tags in GTM for consent
Now that the consent flow is set up, tested and confirmed, it’s time to think about how to utilise this new consent information within your GTM Tag set up.
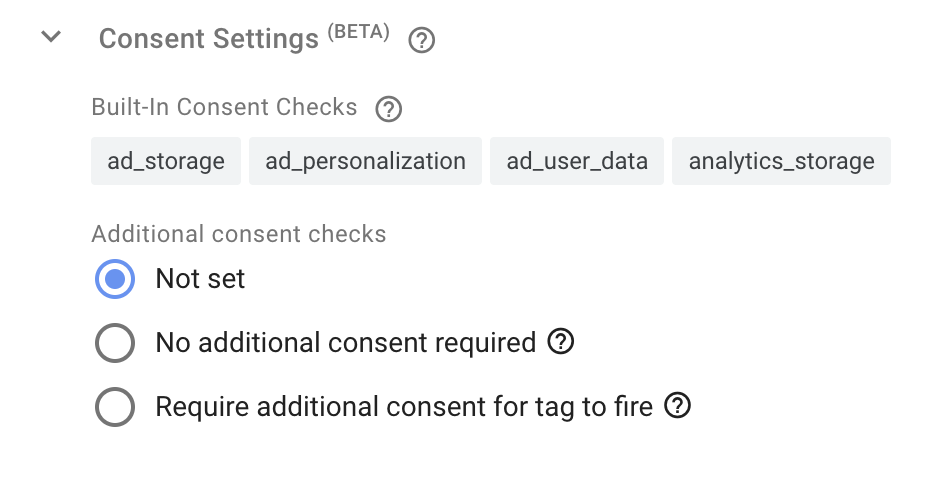
By default, Google’s Tags will already hook into the consent settings. For example if you click into your Google Tag (GA4), then Advanced Settings, then Consent Settings, you’ll see the following;
This means there is no further configuration for you to do on this Tag. It’s already got the relevant checks built-in, meaning that no tracking or user identification data will be sent to this tag unless the listed consent options are granted (even if the Tag has been loaded already). The “No additional consent required” setting here is a housekeeping option – it does the same as Not set, but it just marks that you’ve made a conscious choice.
Unlike non-Google tags (without Built-In Consent Checks), these tags do not need notifying of consent changes by the user. They will detect these automatically and any changes (eg. cookie drops) will happen automatically.
Configuring non-Google tags for consent
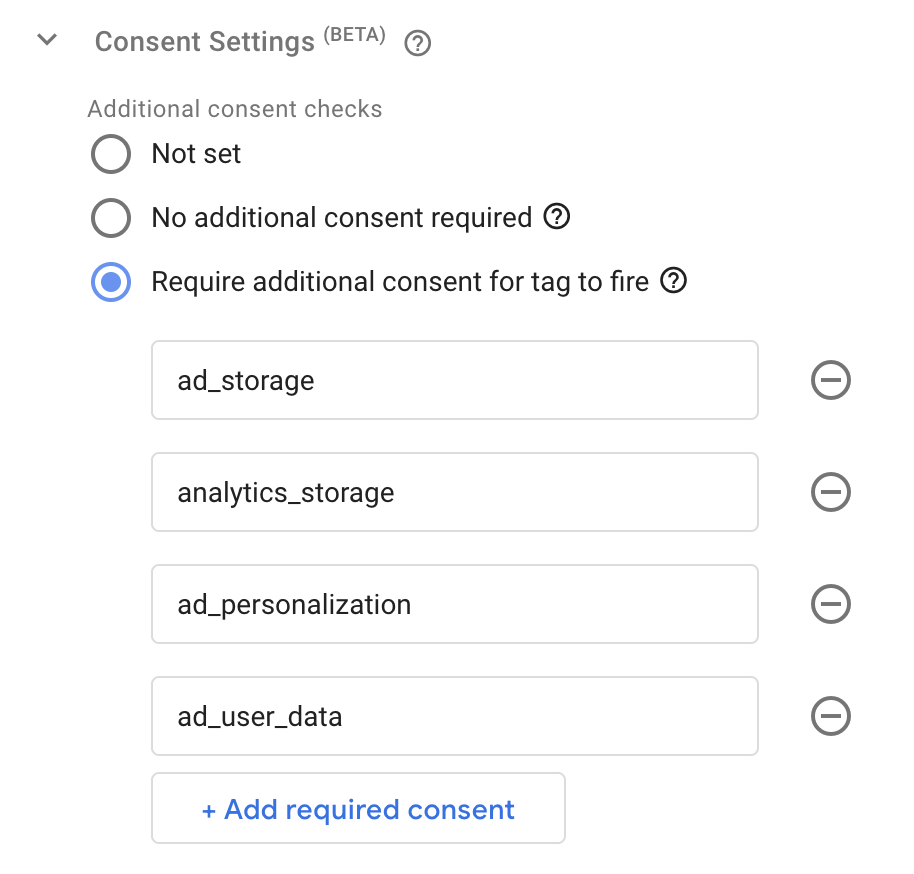
Typically you will also have Tags in GTM for other things, such as a Facebook Pixel. In these cases you will need to go into the same settings, and ensure the consent checks are added. For marketing tags like Facebook Pixel, a safe bet is to copy the same checks from your Google Tag.
Beware that this means the Facebook Pixel will not fire unless the user consents using your new UI – so this means Facebook will likely track less data from your website after this is implemented (a percentage of users will never click OK).
The final thing to tackle is that the 3rd party tags won’t load until the next page load/refresh after the user has consented. Ideally we want them to pull in straight away, as soon as the user clicks OK. This is why we need the dataLayer event in our JavaScript logic. This indicates to GTM that the user consent has changed, and then we can use this as Trigger in GTM to retry loading tags which failed on page initialisation. To make use of this, add an additional Trigger to GTM with a Custom Event to match our event in JavaScript.
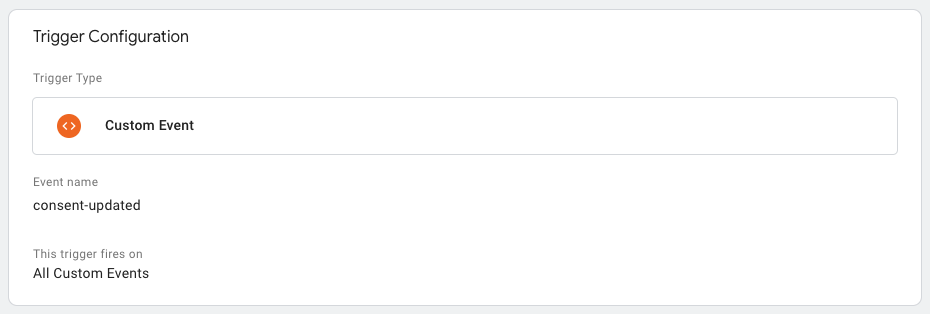
You might be thinking you could set this Trigger up without a Custom Event, based on a button interaction tracked automatically in GTM instead. However if you do that then the Trigger will fire just before the actual consent settings have changed. We want the Trigger to fire just after the consent settings have changed so we can act on the new information.
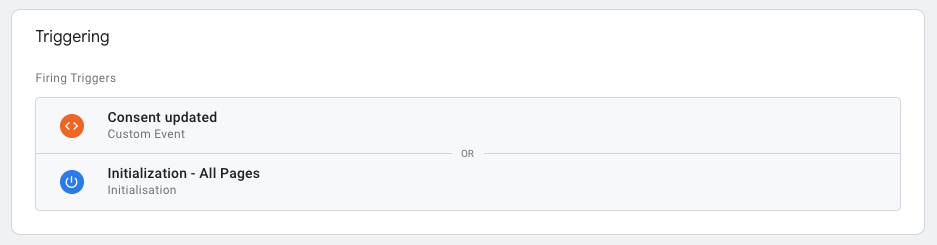
Once this Trigger is available, add it as an additional Trigger to your 3rd party tracking tags.
GTM Consent Overview
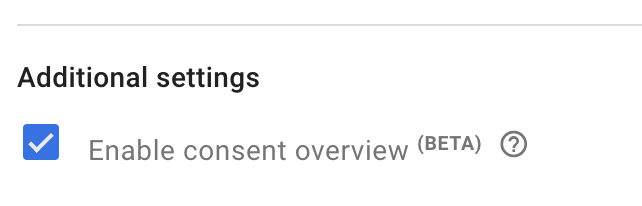
GTM has also introduced another new feature for consent mode. You can enable this in Admin, Container Settings, Enable consent overview.
After enabling this, navigate back to the Tags panel, and click the new shield icon in the top right. This will allow you to quickly see all Tags, and their consent settings. This will encourage you to choose a setting for each Tag (which is why there is the No additional consent required option), which then indicates you’ve made a conscious choice, and will then inform this interface. You should be safe to choose that option on all the Google Tags which are showing built-in consent information (the best part of the consent overview is that is allows you to bulk edit consent settings too).
Going forward, make sure to regularly review the consent overview screen in GTM. This will inform you if any new Tags have been added which haven’t had their consent settings considered.
Final testing and verification
Back to Preview mode in GTM now to double check everything and confirm our 3rd party tracking tags are loading as expected. The first thing to check is that all of your Tags are still loading in at all. This is the most important thing (and how it likely would have been working before you started amending things). Once that’s confirmed, check that the consent settings are correctly not loading and loading the tags as expected. You may need to do some back and forth here, using Dev Tools, Application, Cookies, and deleting our cookie manually (steps assume you’re using Google Chrome).
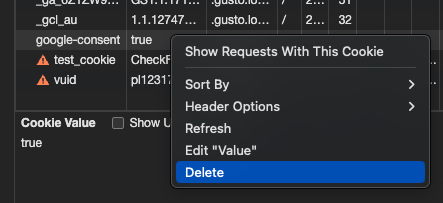
google-consent cookie for testingConclusion
Hopefully this article has provided a well-rounded guide for implementing Google Consent Mode on your website. Please let us know if you found it useful. If any parts are confusing, or could be improved, please also let us know and we’ll update the article accordingly.
If you need expert help implementing Google Consent Mode into your website, please get in touch and we’ll be happy to assist!


